“All my solos sound like scales being played up and down.”
I hear it every day.
So let’s fix it, because there’s actually a very easy way to overcome that problem. It’s something every guitarist should know – maybe even before playing scales. And it starts with just three notes
The Problem with Scale-Based Soloing
Here’s the truth: Your solos will always sound like what you practice.
If your routine is to play scales up and down, well, guess what? You’re going to sound like you’re playing a scale up and down when you play a solo for real. Scales are fun to practice, but they’re just a set of notes. They have no:
- Bending
- Phrasing
- Call and response
- Intonation
- Musical context
That’s why we need a different approach.
Starting Point: Three Notes in G Major
We’re in the key of G major. Let me show you the foundational shape that will transform your playing:
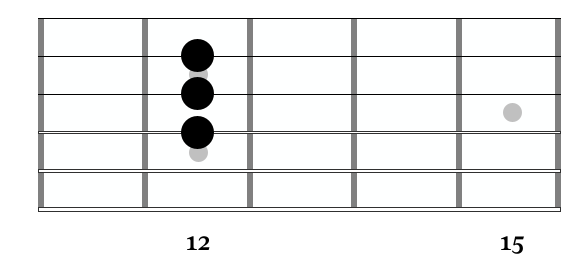
- Root note: Fret 12 on the G string (the note of G – the tonic, the home, the key center)
- Fret 12 on the B string
- Fret 12 on the D string
We have this nice little shape going on. And this is one of the nicest and most versatile shapes to start out with.
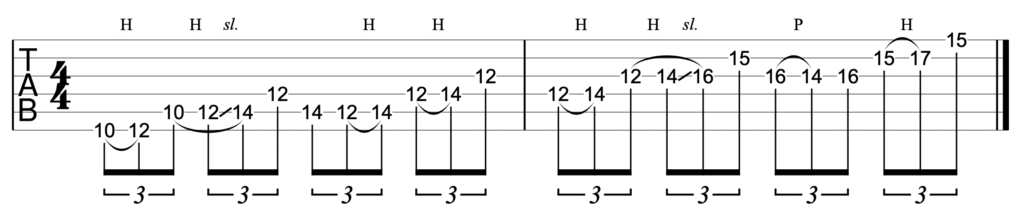
Step 1: Connect the Notes
The first step of using this shape is to connect the notes—first by going up, then by going down. So now we add a couple of extra notes into the mix:
You can start on the root note of G and then move up and down, before returning to that tonic home base.
This feels comfortable, right?
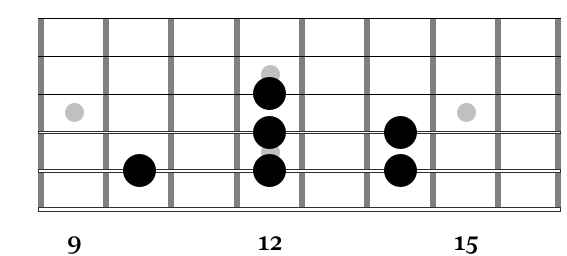
Step 2: Add the Octave (Take It Slow!)
The key here is to take it very slow. Otherwise, we’re back to doing the same thing we did before in no time.
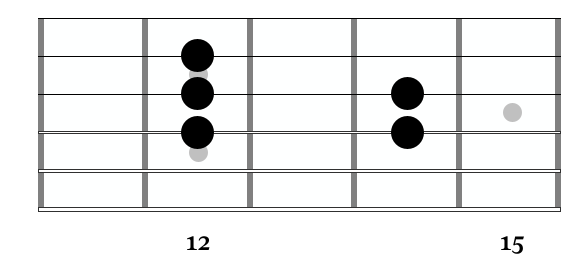
Now we’re adding three little notes to reach the octave. This massively broadens the possibilities we have in phrasing and playing our lines:
As shown on the diagram, you can reach that octave by sliding from the 14th to the 16th fret on the G string.
You can then walk up on the 15th and 17th frets on the B string before hitting the note of G at the 15th fret on the high E string.
This is the same tonic note we started with, but now it’s an octave higher.
You can also reach that same note without the slide, by playing from the starting note of G, up to the higher note, like this:
Again, I want to stress: You’re going to sound like the things you practice. If you practice scales mechanically, you’ll sound mechanical. Practice musical phrases, and you’ll sound musical.
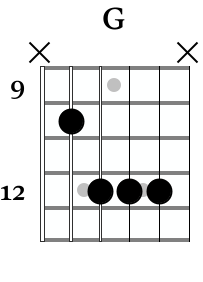
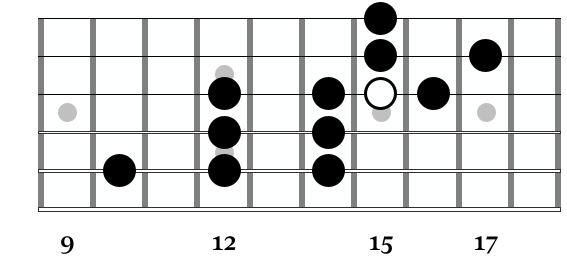
Step 3: Expand to the G Chord
Of course, everything is part of a scale if you zoom out. The scale is just a set of notes, but it’s all about the context it’s being played in. Now we’re zooming out a little further and seeing the context.
Those three notes in the beginning? They form a triad of G major.
Adding the root on the A string at fret 10, we get this nice little chord we see so often – the G major based on the A shape:
We’ve only added one new note into the mix, but we can create a new route to get to that note that opens up even more possibilities:
If we add these alongside the notes we have already been playing, then we end up with this:
There are three notes of G within this shape:
- Fret 10 on the A string
- Fret 12 on the G string
- Fret 15 on the E string
Three tonic notes, three key centres and three places we can resolve our licks to. It’s beautiful.
Don’t start playing it like a scale, starting on the lowest note and going up and down. Remember where we came from. Those three notes we started with are the force of this, the gravitational pull. You always want to get back to that spot. And that keeps you from going up and down and sounding like you’re just playing scales.
Step 4: Bend Notes (Super Important!)
This one is super, super important for guitarists. Just like vocalists, we have the flexibility to bend notes, to make them a bit dirty, to go off key, to go in and out of different flavors. And it’s so important to use that tool.
It’s good to note that this is actually something you can never learn from just playing a scale. A scale has no bending, no phrasing, no character.
What Scale Am I Playing?
I don’t know. I don’t care. Based on some note choices, it’s mostly pentatonic, but there’s so much more happening here. I’m really bending the notes to places that don’t really exist in the scale – somewhere in between the notes, or maybe I’m pushing a little bit further than the notes. Notes are fluid. There are so many possibilities – bend them in, bend them out, and just listen to how it sounds. Remember the good ones.
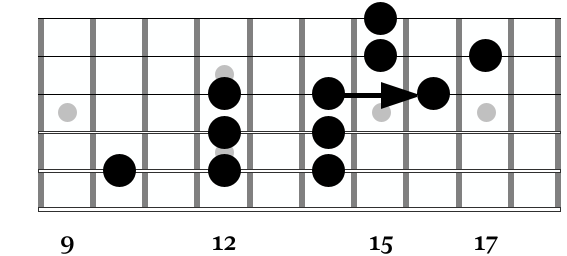
Step 5: Connect the Dots (The Diagonal Exercise)
It is super important to be comfortable with where the notes of this shape lie on the fretboard. You should be able to close your eyes and just let your ear guide you.
But instead of playing the notes up and down in an orderly fashion, no. There’s a little exercise that I’dI like you to play.
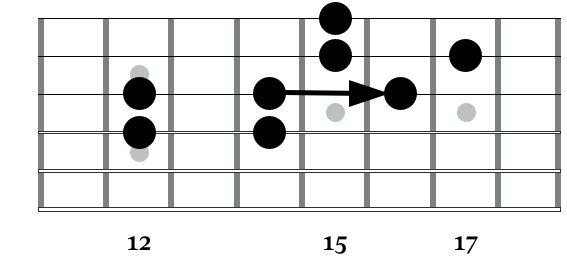
The idea here is that you play an overall descending line, but break this overall movement up with some ascending movements. It looks like this:

And of course you can go back up again:
It’s a super useful and fun thing to practice if you really want to get the most out of this shape and get comfortable sliding up and down the neck.
Step 6: Add Chromaticism
We can use chromaticism to add passing notes, create more tension, and spice up our sounds. Depending on the track you’re playing over and the sound you’re after, different kinds of chromatic notes can sound great.
The Minor Third (♭3)
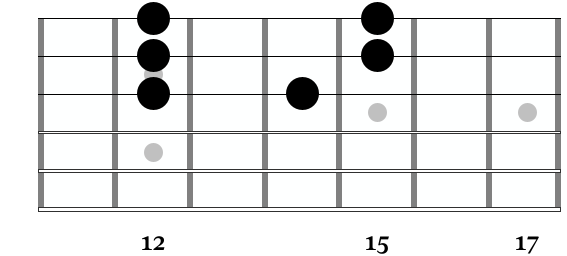
In a major key, I love to add the minor third as a chromatic note, which in the key of G is the note of Bb – found at fret 15 on that G string.
You can play it:
- Before the major third (the 16th fret on the G string)
- Before the two (the 14th fret on the G string)
- As an embellishment that appears as part of a broader phrase
You can also add chromatic notes on the A and D strings at the 13th fret:
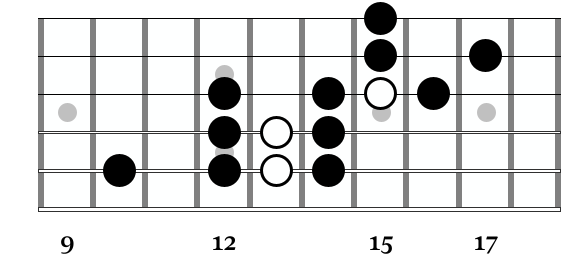
It works very well to add these notes into the mix as part of those longer diagonal phrases where you move from the note of G on the A string up to the note of G on the high E string and back again.
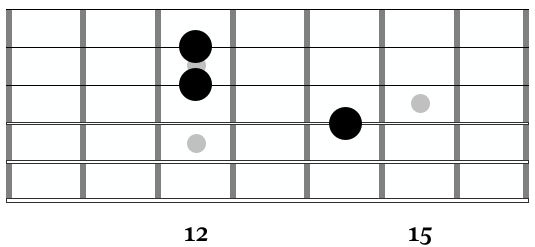
Step 7: Unlock the Fretboard (New Position)
This will really unlock the fretboard, as they say. So far we’ve been playing our home note at fret 12 (basically in the 12th position). But another great place to play it is fret 8 on the B string:

The wonderful thing about this is that all of the notes are basically the same as in the previous shape, but different shapes lend themselves to different sounds and different approaches, target notes and embellishments.
It’s the same notes as we’re playing at the 12th fret. But for me, it sounds different. There are different things to get from that shape.
Why Different Positions Matter
That’s the beauty of guitar – it’s such a weird instrument in terms of where the notes are on the neck. It’s so unpredictable. Sometimes different spots just sound different.
So if you feel totally confident at the 12th position and you can play it with your eyes closed, you can dream about it, you’ve got it – move on. Try it at the 8th position.
And that’s how you explore the neck. This is a massive win in really unlocking the fretboard.
Bonus: The E Minor Version
I prepared the whole thing in E minor as well because we can use the same concept for any key. Now though, our starting notes are slightly different and look like this:
Use your ears and let them guide you as you explore the same concept.
The Big Picture: Stop Thinking in Scales
Although scales are a really useful tool, many guitarists struggle with them because they feel like they should play them how they learned them. And again, they’re going to sound like what you practice.
Start Thinking Differently
- Think in shapes and positions on the neck
- Stop thinking in scales (at least for now)
- Focus on target notes (the gravitational centers)
- Use bending to add expression
- Add chromaticism for color
- Connect positions to unlock the fretboard
- Practice musical phrases, not mechanical patterns
Scales are super useful when taught and used correctly. But they’re a means to an end, not the end itself.
Good luck, and I’ll see you next time!