At first glance, this Red Hot Chili Peppers riff sounds simple. But John Frusciante sneaks in three genius moves that take it from basic to absolutely brutal. This is “Can’t Stop.”
This riff covers many aspects I see beginner and even intermediate guitarists struggle with. I struggled with this. For this riff, getting the notes right alone just doesn’t get you there.
Here’s why this iconic riff is actually really tough to nail.
The Chord Progression Foundation
This riff follows what I call the “Maggot Brain” chord progression – a common four-chord pattern that appears in countless songs:
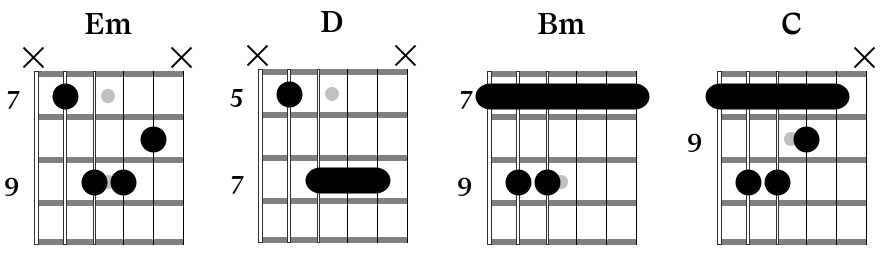
Frusciante doesn’t actually play these chords – he just picks out the root note of every chord and embellishes them with the same two notes on top: D and E.
So a very simplified tab of what he is doing looks something like this:

I used to play the note of D that Frusciante plays over the D chord by fretting the 5th fret on the A string. But if you listen very closely to the track, or watch live footage of Frusciante playing the riff, you can see that he’s actually playing the open D string.
Part One: Syncopation – The Groove Secret
What’s cool is that Frusciante chooses to embellish all the chords with the same two notes on top – the D and the E. But the second time he repeats those two top notes, he plays them heavily syncopated.
What Is Syncopation?
Syncopation is where you lay the accents on the offbeats – in between the beats. Frusciante uses syncopation constantly, with it appearing in songs like:
- “Under the Bridge”
- “Scar Tissue”
- “The Other Side”
- “Mellowship Slinky in B Major”
- “Give It Away”
It’s a core element of his playing style and the Chili Peppers’ sound.
The Picking Pattern: Down-Up Economics
For guitarists, syncopation is actually quite easy once you understand the mechanics. Just look at John Frusciante playing this riff – his hand is only going down, up, down, up, down, up.
The key: You don’t see the rhythm in his picking hand. That’s because:
- Notes on the beats = downstroke
- Notes on the offbeats = upstroke
- Your hand keeps the same steady rhythm throughout
My hand isn’t changing directions or speeding up. It’s only doing the same steady rhythm throughout the entire riff.
The pattern:
- Down, down, down, down, up, down, up, up, up, down, up
This might sound complicated, but it’s easier to visualize when it’s tabbed out:
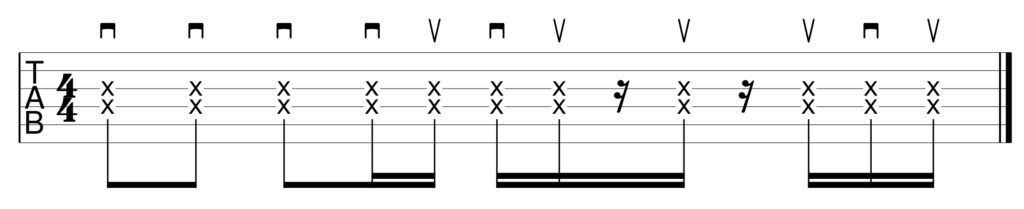
That is then the rhythm that Frusciante repeats throughout the entire riff.
Part Two: Muting – The Secret to That Percussive Attack
Here’s what Frusciante says about his technique: “I tend to pick all the strings, and if I don’t want a certain note to ring through, I’ll lift my finger up on it without lifting up all the way.”
A key element of Frusciante’s playing style – I guess the hardest bit of this riff actually – is hitting more strings with the pick than you’re actually hearing.
This technique draws heavily from funk music.
It gives that percussive or rhythmic character to the guitar. And that, paired with syncopation, is a huge element of the sound of the Chili Peppers.
Now our index finger is making sure nothing else is ringing apart from the string we want to hear. And we do that for all the notes in this riff. We need some class A finger gymnastics to pull this off.
And that is exactly what so many beginner guitarists struggle with.
Pro Tip: Start on Acoustic
A great way to get started with this is to use an acoustic guitar. It’s a little bit more forgiving in that regard and muting mistakes are less obvious.
The Index Finger Magic
Let me give you some idea of the fingering technique:
First position (E minor root):
- Index finger tip: Fretting fret 7 on the A string
- Index finger tip (simultaneously): Muting the low E string
- Index finger barring: Muting the G, B, and E strings (and the D string too)
So that’s the magic right here. You should be able to pull this off before going forward.
The Hardest Part: The D Chord
The hardest bit of this riff is where you wrap around the neck with the thumb and use it to mute the low E and the A string. Now the D string is open, and then the index finger is also barring the G, B, and E strings so they aren’t allowed to ring.
Right after that, you can play fret 7 on the low E string with your thumb. That’s what Frusciante does as well – but I actually fret the C with my middle finger because it feels more comfortable. So choose what works for you.
Adding Dead Notes
This technique also gives us the option to play dead notes or muted notes in between the picked notes of the riff. And that is exactly what Fruscisante does in between that second D and E.
It’s super cool.
The Subtle Balance
The challenge here is that to get the aggressive sound that you hear on the record, you have to be really subtle with the fretting hand:
- Press too hard and you’ll hear more than just that one note you want to hear
- Press too soft and you get all the unwanted noise of the strings ringing out
It’s really tricky to find that balance, and that’s something beginners often struggle with.
Listen to the riff and you’ll hear how hard Frusciante is hitting the notes with his picking hand.
But at the same time, he’s gentle enough with that fretting hand to make sure all the notes you don’t want to hear are muted.
Part Three: Tone – The Stereo Secret
What is really tricky about this riff is that even if you’re playing it right, chances are it isn’t sounding as good as the original. Why?
The Two-Amp Approach
What surprised me getting into this video is how hard it was to get somewhat close to Frusciante’s tone. His tone is so clear and punchy, but at the same time, it’s dirty and thick.
How does he do it?
The secret lies in the use of two different amps.
On the record, if you listen very closely, you’ll hear that there’s two different sounds going on in that riff.
Sound 1: The Clean Channel (Left)
On the clean channel the tone sounds clean and bright. It has:
- Tighter attack
- Lots of clarity
- Less compression
Sound 2: The Overdriven Channel (Right)
Now the other sound:
- Way more overdriven
- Gives it that thick, dirty, and massive sound
- Glues everything together nicely
The Stereo Magic
These differences are emphasized by spreading out the sounds, so the clean sound is played exclusively through the left channel and the overdriven sound is played exclusively through the right channel.
When you pan the channels out like this, the tone sounds massive.
My Setup
My best guess is Frusciante is using two Marshalls. Well, I have zero Marshalls. So here’s what I did:
Signal chain:
- Boss CE-1 – This is the pedal that John Frusciante loves to use as a preamp (no chorus or vibrato, just cranking the signal)
- Left channel: Tone King Royalist for that more clean and spanky sound
- Right channel: Hook Wizard for a more overdriven tone
When I combine them together – one to the left, one to the right – we get this beautiful, massive tone.
Why This Matters (Even If You Can’t Do It)
Two amps isn’t for everyone, and I get it. It’s really not as important as the other factors we discussed. But being aware of the tone balance is valuable:
The key here is not dialing in too much gain. You want some gain to add a bit of meat to the sound, but not so much that you drown out the punch and attack of your playing.
Practical Alternatives
If you don’t have two amps:
- Use an overdrive pedal with a clean blend to mix clean and dirty signals
- Mix in some DI signal to add clarity and attack to your overdriven tone
- Use a bright, edge-of-breakup tone that is somewhere between clean and dirty
You don’t have to copy Frusciante’s tone exactly. But if you’re wondering why your tone doesn’t sound as thick and as massive as what you hear on the record, well, this is a clear guide to get you into the ballpark.
The Guitar Choice
Also, I’m playing a Telecaster in this lesson because to me, this sounds like a Tele. In the video clip, Frusciante is playing a different guitar altogether. But word is he used that guitar because it matched the aesthetics of the video clip better.
Practice Progression
Here’s how to approach learning this deceptively challenging riff:
Step 1: Get the notes and rhythm
- Learn the basic note sequence
- Practice the picking pattern slowly
- Don’t worry about muting yet, just focus on the syncopation
Step 2: Add basic muting
- Start on acoustic guitar if possible
- Work on index finger barring and muting
- Practice the balance of pressure with the fretting hand
Step 3: Advanced muting
- Add the thumb-wrap technique for the D section
- Incorporate dead notes between the repeated D and E notes
- Increase speed gradually
Step 4: Tone and refinement
- Experiment with your amp settings
- Find your clean/dirty balance
- Play along with the record
Have fun playing this awesome riff and good luck!