When John Mayer released Continuum in 2006, one track stood out for its deceptively complex fingerpicking: “Stop This Train.”
The intro alone features a beautiful fingerpicked pattern in D major that’s challenging enough.
But the verse contains a chord so difficult that practically every tab on the internet shows it differently – because no one believes he actually plays it that way.
Spoiler alert: He does. And we have the concert footage from the 2008 concert Where the Light Is DVD to prove it.
Why Every Tab Gets It Wrong
Back in 2006, I brought my copy of Continuum to my conservatory professor. We listened to “Stop This Train” closely, rewound, and listened again. He tried out a few things and came to the conclusion: “That’s got to be two guitars.”
Two years later, John Mayer proved us both wrong. On the 2008 Where the Light Is DVD, he played that same tune – sounding exactly like the CD – on just one guitar.
Even the highest-rated tabs miss the actual chord John plays, because I simply think they don’t believe that he actually plays that chord.
The problem? Most tabs:
- Add a G♯ in the bass (easier to play, but wrong)
- Omit crucial notes entirely
- Show completely different voicings
So, let me break down what’s really happening.
The Foundation: John Mayer’s Signature Picking Pattern
Before we tackle the infamous chord, let’s master the picking pattern that John popularized (though didn’t invent). This technique became so influential that practically every guitarist was copying it in the late 2000s. I did it. You did it. We all did it. There’s no shame in copying – it’s how we learn!
The Thumb Slap Technique
Instead of using a standard fingerpicking technique on that Dsus2 chord, John adds a percussive element. On every backbeat (beats 2 and 4), we gently hit the string with our thumb, creating a nice little drum pattern.

The pattern:
- Play the bass note and melody simultaneously
- On beats 2 and 4 (the backbeats), gently slap the string with your thumb
- Immediately flick upward with your index finger to hit a melody note
The key challenge: You’re doing two things simultaneously – the percussive slap and the melodic flick. This creates a drum-like rhythm while maintaining the melody.
Technique detail: I’m hitting the strings with my fingernail, actually flicking down. So not a pluck, but a hit.
Applying It to D Major
Starting with D, we play the D note and the B string at the same time with the thumb in the middle. Then we do the slap and the flick of the index finger on the G string. At the end, we do the same thing on beat four – the slap and the index finger hitting the B string.
This picking pattern alone is already quite challenging – especially if you want to make it sound fluent with the chords that John is playing. It’s really beautiful.
The Intro: A D Major Vamp with Extensions
I see the intro as a vamp in D major. I don’t think we really need to label the chords individually – it’s just D major with some nice extensions and a top line.
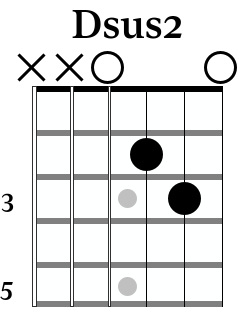
The picking pattern stays consistent while your fretting hand navigates various D major colorings. You start with the Dsus2 chord shape shown here:
And then move through these different voicings:
After you play the final chord with just your finger on the G string 2nd fret, you then move back to the Dsus2 chord and loop through the progression again.
As you do this, focus on keeping the percussive slap steady while the melodic line dances above.
The Verse: The “Impossible” Chord Revealed
Now, this next bit is where most – if not all – tabs go wrong. The bit we thought years back had to be two guitars.
In essence, it’s the same line, but now there’s a G note in the bass. And of course in classic John Mayer style – John frets it with his thumb.
Chord 1: G Major 7
The first chord is a bit different – it’s a Gmaj7:
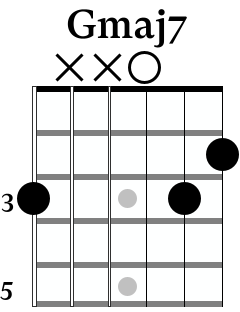
Here you play the bass note (the 3rd fret on the low E string) with the thumb, and then use your middle and first fingers to play the notes on the B and E strings.
The picking pattern over this chord stays the same as on the Dsus2 and D chord variations.
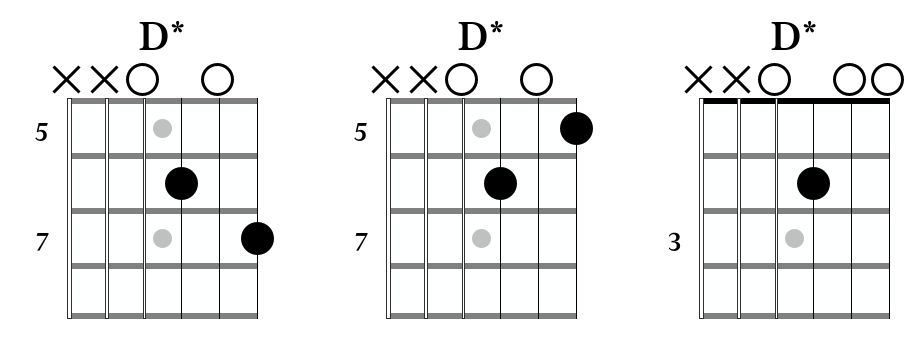
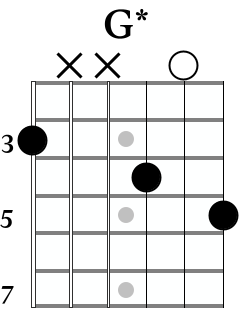
Chord 2: The One Everyone Gets Wrong
Now we get to the impossible chord – the one that everyone gets wrong, and the one that I couldn’t play before filming this video, to be honest.
Here’s how it looks:
You can play this voicing by using your thumb to fret the G note on the low E string, your middle finger to play fret 6 on the G string and your pinky to play fret 7 on the high E string
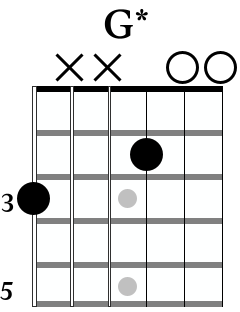
Chord 3
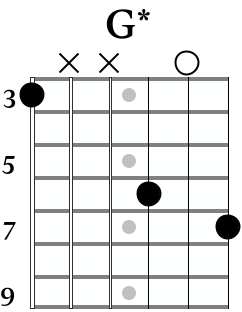
After Mayer plays that “impossible” chord, he moves to a different chord. This is another variation of G and looks like this:
The fingering here is the same as the previous chord – so you play the low E string with your thumb and then the B and E strings with your middle and pinky fingers. Now though the stretch isn’t quite so painful!
Chord 4
The final chord returns to a voicing that is similar to one of the D chord variations from earlier in the progression, but now there is the G note in the bass. It looks like this:
Making the “Impossible” Chord Possible
As challenging as that stretched chord with the thumb in the bass is to play, it IS possible. What really helped me is two things:
- Thumb positioning: My thumb is sliding a little bit more – really towards the edge of fret 3, maybe even a little bit over towards fret 4. I notice I can still get the G note if I move it a little bit over, because I’m fretting with the side of my thumb. That’s still on fret 3. So it looks like I’m fretting fret 4, but it’s actually still a G note. And that way my pinky can reach fret 7 on the high E and my middle finger can play fret 6 on the G string.
- Hand adaptation: I definitely noticed in preparing for this video that if you play the chord a bunch of times over and over, your hand adapts to the chord shapes. You sort of stretch out your hand a little bit, making it so much easier to play. Because before this video, I definitely could not do it.
The Alternative Fingering (That Doesn’t Work as Well)
There is a different way to play that tricky chord. In this alternative fingering we don’t use our thumb to fret the G, but either our index finger or middle finger depending on the chord.
The chord shape remains the same as before:
But with this alternative voicing you use your first finger on the low E string, and then your middle and pinky fingers to play the notes on the G and high E strings.
I could never get this chord to sound as fluent or smooth as when I used the thumb, so I decided to switch back to the fingering that Mayer uses when he plays the chord.
Is It Actually Impossible?
99% of the time I say that the problem is not your hands. A G major, a C major, barre chords – people often blame their hands. It’s not your hands.
But for this song, it could be an actual physical limitation.
So if you can’t make this voicing work: Don’t feel bad. Don’t stress out.
Instead, try to find a voicing you like that has the same ring to it. But please – do not use fret 4 on the low E. Do not do it.
Beyond the Verse: The Rest of the Song
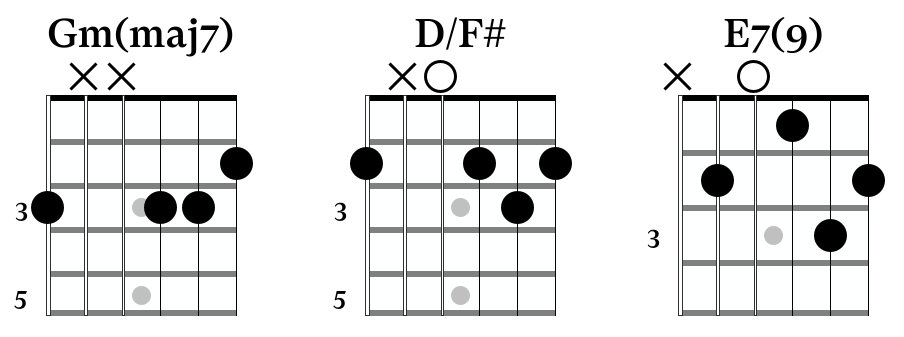
I think this tune in general is so lovely to learn. The chords in the chorus are just amazing:
After this, Mayer then moves to a chromatic descending line over an A chord, which is just beautiful.
There are so many wonderful things in this little track. It’s the perfect tune for me and it’s so underrated. I don’t understand why this isn’t his most popular song.
Learning Resources for Acoustic Fingerpicking
If you’re serious about mastering this style of acoustic guitar playing, it requires dedicated study of:
- Percussive fingerpicking techniques
- Thumb fretting and extended reach voicings
- Compositional techniques like voice leading
- Rhythmic independence between thumb and fingers
If you want to learn more about these kinds of techniques – and develop your acoustic guitar skills by learning beautiful songs in a range of different styles, I’d invite you to check out my course Acoustic Adventure, which covers fingerpicking patterns, advanced chord voicings, fingerstyle blues, and much more.
Final Thoughts: The Challenge is Worth It
“Stop This Train” represents a beautiful challenge for intermediate guitarists. While the verse chords may seem impossible at first, with dedication and proper technique, they can become achievable for most players.
The key lessons:
- The percussive picking pattern requires patience and coordination
- Proper thumb positioning unlocks seemingly impossible voicings
- Hand adaptation happens with consistent practice
- Some physical limitations are real – know when to adapt
- The full song rewards study beyond just the difficult sections
Is this John Mayer’s most underrated song? I certainly think so. The combination of technical challenge, harmonic sophistication, and sheer beauty makes it a masterpiece that deserves far more recognition.